Sunday, September 25, 2011

Day 32 - Creme Brulee & Apple Crumb Cake

Sunday, September 25, 2011


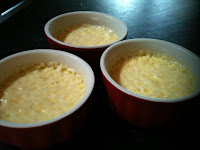
I can't believe it's officially autumn! It's my favorite time of year and I am so inspired by all of the fall flavors [apple, pumpkin, etc]! This weekend I had a few different baking sessions. The first one was on Friday night in preparation for my brother Anthony and his friend to come for dinner on Saturday night. I wanted to make a special dessert and Creme Brulee seemed like the perfect option - it's easy to make but looks really fancy! The only ingredients in it are heavy cream, egg yolks, sugar and a vanilla bean. I started by heating the heavy cream and vanilla bean until it came to a slight simmer. I then mixed the egg yolks and sugar with an electric mixer until they became thick and light yellow. I slowly added the heavy cream and vanilla to the eggs [slowly so the eggs don't scramble!] and I poured the mixture into ramekins which I had in a baking pan filled with about an inch of water.
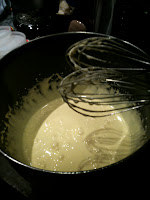
Egg and Sugar Mixture


Ramekins ready for the custard!


The creme brulee's baked in about 40 minutes until they were set around the edges and still slightly loose in the center. This is the only tricky part about making these… knowing when they are cooked enough but not too much. Once the creme brulee's came out of the oven, I let them come to room temperature and then put them in the refrigerator to set completely. These are best made a day ahead so they have time to chill in the fridge.


After dinner on Saturday night, I took the creme brulee's out of the refrigerator and was ready to prepare the best part - the hard sugar topping. To do this, I sprinkle a thin, even layer of sugar over the top, then use my mini torch to caramalize the sugar creating a nice, hard top. The best part of eating a creme brulee is cracking into the top with a spoon and scooping out the delicious vanilla custard.  The hard sugar on top gives a nice contrast in texture to the creamy center. You can't beat that!

Chilled Creme Brulee - ready for the sugar topping! 
Getting Torched! 
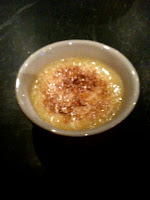
Finished Creme Brulee!


Today, my friend Sheila is coming over to bake with me. We are going to make an apple crumb cake and then she wants me to show her how to make my mom's sheet cookies that are made with saltine crackers.

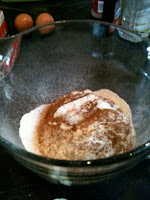
We started with the apple coffee cake. To start, I creamed unsalted butter and brown sugar and added 2 eggs once the mixture was smooth and fluffy. Next, I sifted the dry ingredients together [flour, salt, cinnamon, baking soda] and added them slowly to the wet ingredients. In between adding small amounts of the dry ingredients to the wet ingredients, I added sour cream and vanilla which makes the cake moist. Finally, I folded in chunks of apple [and I used both a green and red apple].
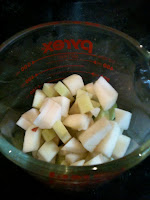
Apples ready to go!
Dry Ingredients

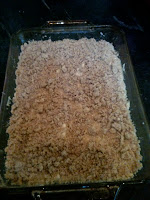
 I spread the batter in a baking dish and was ready to make the crumb topping. The crumb topping was really simple. I just mixed together softened butter, brown sugar, cinnamon, and flour until it formed coarse crumbles. I sprinkled the crumbs over the top of the batter and put it in the oven to bake for about 40 minutes.


Ready for the oven!
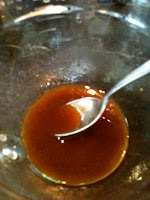
While the cake baked, I made a glaze for the top consisting of brown sugar, vanilla and water.

Glaze
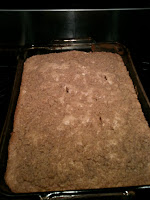
When the coffee cake came out of the oven, it looked and smelled delicious! We poured the glaze over the cake and let it cool for about 20 minutes. Of course we couldn't wait until after dinner, so we cut into the cake to give it a try and it was AMAZING! Probably one of my favorite things I've made in a long time! This is a MUST try!


Just out of the oven

SO YUMMY!!!
Lastly, Sheila and I made my Mom's sheet cookies which is a simple and delicious treat that everyone loves. We started by lining a cookie sheet with unsalted saltine crackers to cover every inch of the sheet. Next, we melted butter and sugar until the butter was completely melted and the mixture came to a slow boil. The mixture is then poured over the saltines and placed in the oven until the cookies start to bubble. Next, we sprinkled semi-sweet chocolate chips over the top and put the tray back into the oven so the chips could melt. Once the chips were soft, we spread them with a knife to create a smooth chocolate layer. Finally, chopped walnuts are sprinkled over the top of the chocolate and the whole tray is put into the refrigerator to harden. Once the cookies are hardened, you just need to cut them up and enjoy!
Sheila preparing the baking sheet!
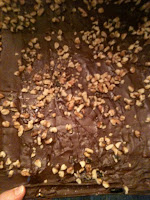


Finished Cookies :)

I think I am officially baked out for this weekend! Stay tuned until next week :)

Day 31 - Chocolate Chip Muffins

Sunday, September 18, 2011

Today I decided to make a nice warm breakfast treat - chocolate chip muffins! It's starting to feel like fall [already] and nothing beats a nice warm muffin for breakfast with a cup of coffee! Keep in mind chocolate chip muffins certainly are a treat for a special occasion - you can't always have chocolate for breakfast :)

This recipe was so easy and I had all of the ingredients on hand! I literally whipped up the batter, baked the muffins and cleaned up in less than an hour. All this recipe takes is 2 bowls - one for the dry ingredients [flour, sugar, salt, and baking powder]; and one for the wet ingredients [sour cream, milk, melted butter, eggs, and vanilla]. I combined the wet and dry ingredients together, added the chocolate chips and they were ready to be put into the muffin tins!


After about 20 minutes the muffins were ready to come out. They looked and smelled great.

Finished Product!
I tried one warm and it was pretty good- I mean you can't beat melted chocolate. The only thing is that you probably have to serve them warm because when they cool down there will be whole chocolate chunks, which might not be as good when they aren't melted. The other thing I wasn't crazy about was that the muffin itself wasn't all that flavorful without the chocolate.

Monday, September 5, 2011

Day 30 - Homemade Ice Cream Sandwiches

Monday, September 5, 2011

Today is Labor day which to me signifies the end of summer which makes me really sad. So today I wanted to make an end of summer treat.

I decided to make homemade ice cream sandwiches using chocolate chip cookies and vanilla ice cream. The cookie recipe I found was actually from another blog. I love finding recipes on other baking blogs because because I feel like they give real, honest reviews of the recipes they try. The cookie recipe was called "Thick and Chewy Chocolate Chip Cookies" - how good does that sound?!

The recipe my Mom and I usually use for chocolate chip cookies is a one that comes from the back of the Toll House chocolate chip bag and they are awesome, but today I wanted to try something different. The recipes are similar, but one difference I noticed was that this recipe used a lot less butter than the Toll House one.

To start, I mixed the butter (only a half a stick), white sugar, light brown sugar, salt, vanilla and an egg until they were combined. Next, I whisked together flour and baking soda and added it to the wet ingredients. Finally, I added the semi-sweet chocolate chips, and they were ready to scoop out onto a baking sheet.

The cookies baked for about 14 minutes and they looked great. They came out really thick and they were chewy in the middle and a little bit crisp on the edges. I noticed that the cookie recipe with more butter tends to come out a little flat; maybe less butter is the key to making thicker cookies that keep their shape.

Finished Cookies

When the cookies were cooled, I scooped some vanilla ice cream in between two cookies and put them in the freezer for the ice cream to harden.


Ice Cream Sandwiches :) 

Can't wait for my family to sample these - I'm pretty sure they'll enjoy them!

Dad enjoying the ice cream sandwich!

Saturday, August 27, 2011

Day 29 - Congo Bars

Saturday, August 27, 2011

Even though Hurricane Irene is on the way, I decided I might as well bake a little in case we lose power and I'm unable to use the oven tomorrow. I found a recipe last week called Congo Bars on Bakerella.com and they are a cross between chocolate chip cookies and brownies… also known as blondies. If we're going to be without power for a day [hopefully not more] we might as well have a yummy treat on hand!

I actually had most of the ingredients on hand for this recipe: flour, baking powder, salt, brown sugar, eggs,  butter, chocolate chips and vanilla extract. First, I sifted together the flour, baking powder and salt and set it aside. Then, I mixed the softened butter and light brown sugar together until the butter was incorporated into the sugar. Next, I added the eggs and vanilla, and then slowly added in the flour mixture. I left a little flour aside to toss the chocolate chips in before I added them to the batter. This is a trick to prevent the chocolate chips from sinking to the bottom of the pan while they bake.

I poured the batter into a 9x13 baking dish and they were ready to bake for about 45 minutes.


Ready to bake!

When they came out of the oven they looked and smelled amazing! Can't wait to share these with my family when we are stuck inside during the storm! 


All done!

Stay tuned for next week :)

Sunday, August 21, 2011

Day 28 - Cookies and Cream Cupcakes

Sunday, August 21, 2011

I recently started visiting the website Bakerella.com [thanks to a co-worker for the suggestion] and I was instantly a fan! Besides the website being adorable and fun, there is such a great variety of recipes. Part of what makes each recipe look so good is the fabulous photos that will make your mouth water! As soon as I saw the Cookies and Cream Cupcakes I knew that I had to try these.

Today was the perfect rainy day to bake and I decided to try out the Cookies and Cream cupcakes. The batter was sooo simple to put together. First I whisked the dry ingredients together [flour, cocoa powder, sugar, baking powder and soda, and salt]. In the same bowl, [I love receipes that only use one mixing bowl] I added eggs, oil, milk, vanilla and hot water and mixed the whole thing together. The batter was very watery but according to the website, that's how they are supposed to be.

Once the batter was ready, I prepared the cupcake tins with the cupcake liners and the Oreo's. The website suggests two different ways to put the Oreo's in, you can either leave the Oreo's whole or crumble them up, but I decided to try it both ways. I poured the batter over the Oreo's and put them in the oven to bake for about 17 minutes.


When the cupcakes came out they looked awesome! I decided to use a store bought vanilla frosting and I  crushed a few Oreo's so I could dust the top of the cupcakes with cookie crumbs. When the cupcakes were cooled I added the decorations and they looked scrumptious! I asked my little brother and his friend to test them out [tough job they had] and they loved them! The cake was really moist and they looked adorable!


This recipe is definitely a keeper, kids and adults alike with love them!


Saturday, July 30, 2011

Day 27 - Doughnut Muffins & Sheet Cookies

Saturday, July 30, 2011

Today I decided to make muffins for the family this morning. I found a recipe called "Doughnut Muffins" that I found on a blog called "How To: Simplify."They are cinnamon muffins with a cinnamon sugar coating. 

The recipe was super simple. I mixed the dry ingredients first: flour, baking powder, salt, and cinnamon and in a separate bowl I mixed the wet ingredients: oil, an egg, milk and sugar. I combined the wet and dry ingredients and the batter was ready. 

The muffins baked at 350 for about 20 minutes and as they baked I prepared the cinnamon and sugar topping. I melted a bit of butter in a bowl and mixed the cinnamon and sugar in a separate bowl. When the muffins came out of the oven, I immediately removed them from the muffin tins and dipped the top in the melted butter and then rolled them in the cinnamon sugar mixture. 

Now I have to admit, when I saw that the muffins are dipped in melted butter, I was a little bit skeptical because frankly it sounds disgusting. But I was pleasantly surprised when I saw that the muffins didn't get butter soaked but it just helped the cinnamon and sugar create a nice crust (thats where the doughnut part comes in).

The muffins were crunchy on the outside and soft on the inside. They were delicious! I know everyone will love these today. My only regret would be not doubling the batter because it really only makes 12 muffins. 


The next thing I made came as a surprise.. my mom Maria's sheet cookies. She is making them for my cousins wedding because he and his soon to be wife love them. My mom has been making these for as long as I can remember and I figured I would help out this time and lean the specifics of how they are made. 

We started by preparing the bottom of the cookie which is made of saltine crackers. I put one layer of the saltines on two large cookie sheets while my mom melted butter with sugar on the stove. Once the butter and sugar are melted together they are then poured over the saltines and placed in a 375 degree oven until the sugar and butter start to bubble and brown. 


When the crackers come out of the oven we topped them with semi-sweet chocolate chips. We place the cookie sheets back into the oven just so the chocolate melts a bit and is spreadable. We finish the cookies by making sure the chocolate is spread evenly over the crackers and then top it with chopped walnuts. The cookies are refrigerated until they are ready to be cut and served. They are the perfect salty and sweet treat that everyone loves.


Saturday, June 25, 2011

Day 26 - Blueberry Strudel

Saturday, June 25, 2011

Today I saw Claire Robinson from "5 Ingredient Fix" on the Food Network make a blueberry strudel and I decided thats what I would try to make today. If I wasn't convinced to try this recipe already, when I got to the grocery store, the blueberries looked amazing, which really got me excited to make this!

The recipe was really quite simple. I started by heating the blueberries, sugar, a dash of salt, and a little corn starch (to help thicken the sauce) in a pan. The blueberries began to pop pretty quickly and created a lovely, thick sauce in just a few minutes.


While the blueberry sauce cooled, I unrolled the thawed phyllo dough and covered it in a damp cloth so it didn't dry out. The last time I tried to work with phyllo dough, it was really challenging because as soon as I unrolled the dough it began to crack and break apart. This time, I made sure that the dough was room temperature before I worked with it and it didn't break apart at all!

I layered three sheets of phyllo dough, brushing melted butter on each layer. I then put a dollop of the blueberry mixture in the lower half of the dough and rolled it up to create a small bundle. I brushed a little more butter on top of the bundle, sprinkled it with sugar, and cut small slits across the top so the air could escape while it baked.


I repeated this two more times, to make three strudels in total.  The strudels baked for about 15-20 minutes and came out golden brown and oozing with blueberries. They looked and smelled amazing.


I served these with vanilla ice cream and they were awesome! The blueberries were not too sweet and the crisp phyllo dough was the perfect compliment to the gooey center.

I would definitely make these again!