Sunday, March 25, 2012

Day 47 - Apple Cheese Danish

Sunday, March 25, 2012

Today I decided to make a recipe called Apple Cheese Danish which comes from a blog called "A Cozy Kitchen." The pictures of this danish looked amazing and as you may have noticed from many of my previous posts, I love recipes with apples and cream cheese, so this recipe was right up my alley.

The recipe was quite simple to make actually. I started by making the cheese mixture, which is just cream cheese, ricotta, lemon zest, sugar, vanilla, and salt. Next, I peeled and sliced two apples (a granny smith and a gala), and tossed them with cinnamon, sugar and lemon juice.

Cheese Mixture Pre-Mixing
Apples
The next step was to prepare the room temperature puff pastry. I rolled out the dough on a floured surface and then cut the corners off the top of the dough. The next step was to cut diagonal strips down both sides of the dough, which will get folded over the filling later.
Prepared dough
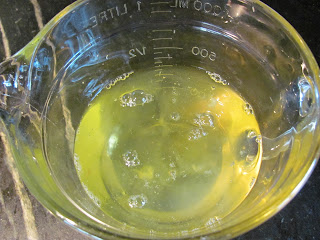
Once the dough was ready, I spread a layer of the cheese mixture down the center and top it with the sliced apples. The dough is "braided" over the filling by folding over the strips of dough from either side of the center (see photos below). Before the danish went into the oven, I brushed the top of the dough with a little egg wash to ensure that it would brown nicely in the oven.
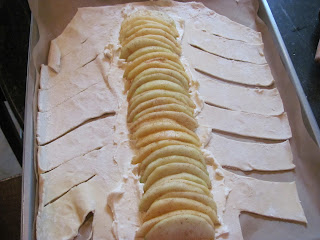
Before folding the dough
After "braiding" the dough
Ready for the oven
While the danish baked, I made the glaze for the top. The glaze is really simple to make; I just mixed together confectioners sugar and milk until a thick, glossy glaze is formed.
Glaze
Apple Cheese Danish 
When the danish came out of the oven, I drizzled the glaze over the top while it was still warm, which made it look truly irresistible. I was blown away by the taste of this danish. The cheese mixture combined with the apples while it baked to make a delicious, tart filling. With the crispy puff pastry and sweet glaze to top it off, the danish was absolutely scrumptious. This could be served as a part of a special brunch OR for dessert. It is simply perfect and a MUST try!
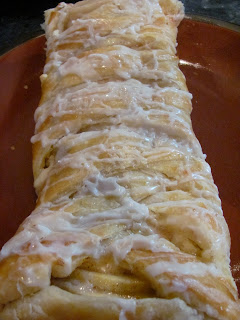
Ready to eat! 
Stay tuned until next time :)

Sunday, March 11, 2012

Day 46 - Oreo Cream Cheese Brownies

Sunday, March 11, 2012

Tonight I am hosting a girls night at my house and I wanted to make a delicious dessert. I decided on some kind of brownies because well, who doesn't like brownies?! I found a recipe from a website called "Annie's Eats" for Oreo Cream Cheese Swirl Brownies… honestly who doesn't like Oreo's, brownies, and cream cheese? These are some of my favorite items in life so I had to try these!

I started with the chocolate brownie batter by heating butter and sugar until it comes to a boil. After about a minute of boiling, it is taken off the heat to cool. In the meantime, I sifted together the dry ingredients [flour, cocoa powder and salt] and set that aside. I added eggs and milk to the cooled sugar and butter mixture, and poured it all into the dry ingredients. Next, chopped Oreo's are added. Once it is all combined, the brownie batter base is poured into a buttered and floured 9x13 pan.
Butter/Sugar Mixture
Brownie Batter
The next and last step is to make the cream cheese batter. With a hand mixer, I beat cream cheese, confectioners sugar and vanilla together until the mixture is smooth. This mixture is dolloped on top of the brownie batter and swirled around to create a marbling effect.
Cream Cheese Batter
Brownie batter with Cream Cheese on top
Ready for the oven
The recipe says the brownies should bake for about 22-24 minutes, but mine took a little while longer. It may have taken more time because I decided to double this recipe after reading the amazing reviews on the Annie's Eats website! My brownies took closer to 30-32 minutes to bake, and let me tell you that it was hard to wait! Once the brownies were out of the oven and cooled, I stored these in the refrigerator for a little while to let the cream cheese set up.
Finished Brownies
The brownies were a HUGE hit at the party tonight. I didn't even have time to take a picture of them cut, because before I knew it, everyone was eating them and then packing up the extras to take home! I guess you'll just have to trust me that they looked delicious and were delicious!

I'm London bound tomorrow so stay tuned until next time :) 

Sunday, March 4, 2012

Day 45 - Angel Food Cake

Sunday, March 4, 2012

Today I decided to make angel food cake. I've always loved angel food cake, it's light and airy and pairs perfectly with fruit making it the perfect summer dessert. Although its not summer yet, I decided to better start testing recipes so I can make it all summer long!

I found a recipe called "Perfect Angel Food Cake." With a name like that, its got a lot to live up to! The ingredients are as follows: egg whites [lots of them!], sugar, vanilla extract, cake flour, salt and cream of tartar.

I started by sifting together half of the sugar and all of the cake flour.

Cake Flour and Sugar

Next, I separated about 11 eggs [you need 1 1/2 c. of egg whites]. I poured the egg whites into my stand mixer and when they became frothy, I added in the salt and cream of tartar. Next, I added the other half of the sugar a little bit at a time. When the egg whites form soft peaks, I added in the vanilla extract and beat for a few more seconds until it was incorporated.
Egg whites to start
Egg whites after!
Finally, the sugar/cake flour mixture gets slowly folded into the egg whites. You have to be extremely careful not to deflate the eggs when you fold in the sugar and flour. This was definitely the most tedious part because you really have to take your time and not rush.

Batter complete

Once the flour and sugar is incorporated into the eggs, it is poured into a tube pan with a removable bottom. The angel food cake bakes for about 55 minutes until the top springs back when lightly pressed.

Ready for the oven

The instructions say to leave the angel food cake for an hour [left sitting upside down] before you take it out of the pan.

Cake out of the oven

The cake came out of the pan pretty easily - I just ran a knife around the edges to help it out. I served the angel food cake with whipped cream and fresh strawberries.

Ready to eat! 


YUM!!!

The cake was absolutely perfect!! It was so light and fluffy, just a light and delicious dessert. I have a feeling I will be making this many more times as the warm months approach!