Wednesday, January 25, 2012

Day 39 - Mini Cannoli Cups

Sunday, January 22, 2012

Today I made yet another recipe I found on Pinterest.com. The recipe is for Mini Cannoli's and it originates from a blog called "Cooking with Sugar." I have always loved cannoli's and have always wanted to try making them, but they seem really intimidating, having to fry the shells and all. This recipe is a lighter version with baked shells and I felt it was something I could definitely tackle.

The recipe really only had 3 simple steps. The first is making the cream filling which consists of ricotta cheese, sugar [both confectioners and white], vanilla extract, and mini chocolate chips. Everything gets mixed together in a stand mixer [except the chocolate chips] until a thick, smooth mixture forms. It is then put in the refrigerator until the shells are ready to be filled.

Ingredients ready to be mixed
Almost ready!
Ricotta mixture ready for the fridge
The second step is making the shells. The ingredients needed for this are as follows: a frozen pie crust, course natural sugar [turbinado], and cinnamon. All you do is roll out the pre-made pie crust, sprinkle it with the turbinado sugar and cinnamon, and roll over the crust with a rolling pin to press the sugar and cinnamon into the dough. Small circles are cut out of the dough and pressed it into my mini muffin tin to create small cups. These bake at 450 degrees for 10 minutes and they are ready.
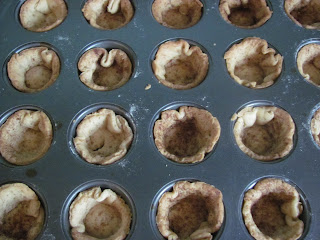


Finished cannoli shells 

I didn't actually fill the shells until we were ready to sample them after dinner that evening. If the shells are filled to early, they will get soggy, so it's best to wait to fill them until you are ready to eat!

When I was ready to assemble the cannoli's, I filled a pipping bag with the cream and pipped a dollop of cream into each shell and then topped them with the mini chocolate chips. Another way to do this is to mix the chocolate chips into the cream before you fill the pipping bag, this way there are chocolate chips running through the whole center - you can't go wrong either way.


Finished Cannoli's!
The cannoli's were really good. Although they are made differently than traditional cannoli's, you definitely get the flavor and essence of a cannoli in much less time and with much less work!

Stay tuned until next week :)

PS. If you aren't already a follower of this blog, please become one! Just click "join this site" on the right side of the page under "followers" and enter your email address (this site accepts email addresses from gmail, yahoo, twitter, and aol)! THANK YOU :)

Tuesday, January 17, 2012

Day 38 - Black Bottom Cupcakes

Monday, January 16, 2012

Today I decided to do another little baking session. My Dad was away in LA for the long weekend visiting my sister, and is coming home later tonight. I decided to bake a little home coming treat for him to enjoy after dinner.

I found a recipe for Black Bottom Cupcakes on Pinterest.com [surprise, surprise] and it originated from a blog called "Bake Me More." The cupcake is a devils food cake base with a chocolate chip cream cheese mixture dolloped on top [in place of frosting]. They looked really cute and the cream cheese mixture actually looked like hearts in the pictures from the blog.

I decided to make it easy for myself and go with the store bought cake mix - Pillsbury Devils Food Cake [always delicious]. I whipped up the batter in minutes and then started on the cream cheese mixture which was just a bar of softened cream cheese, sugar, an egg and mini chocolate chips. It called for "softened cream cheese" but apparently mine wasn't soft enough [hello impatient] and so I had a hard time getting the mixture to be really smooth. I figured it wouldn't be a problem since it was just going to get baked anyways.

Prepared cake batter

Chocolate chip cream cheese batter

 I filled the cupcake liners with a little bit of the chocolate cake batter and then dolloped the cream cheese mixture on top. I started off really heavy handed and put a bit too much cream cheese on each one. As I progressed, I scaled back on the amount of cream cheese I put on each cupcake and it seemed to look better [and more like the blog].
Cupcakes ready to bake
The cupcakes baked for about 20 minutes and didn't exactly have the heart shape cream cheese top like I had hoped. The cream cheese [since I put way too much on some of them] spread out over the top of the cupcake and although it didn't look super pretty, I was sure it would still taste delicious.


Cupcakes [with a lot of cream cheese!]


A little less cream cheese :) 
My Dad and I each sampled one after dinner and they were delightful! The cake was moist and the cream cheese added a sweet and creamy touch, which is the reason why you don't need frosting on these cupcakes.
So good!

These were so easy and yummy - just think of the varieties you can make with these... red velvet cupcakes with cream cheese on top... yum!

Stay tuned until next time :)

Sunday, January 15, 2012

Day 37 - Apple Tart

Saturday, January 14, 2012

Today I decided to try a recipe I saw on Pinterest.com which actually originated from the Food Network show "Pioneer Woman." The recipe is for an apple tart that looked super easy and delicious.

The recipe calls for very few ingredients which is always nice [especially when you are feeling a little lazy!] You only need apples [I used both red and green], puff pastry, brown sugar, a pinch of salt, and any garnishes you choose. The best part about making this recipe was having a friend to help me! My fabulous friend Claudia was over to lend a hand with this dessert. The first thing we did was take out the puff pastry to defrost [it takes about 40 minutes]. The next step is to peel and thinly slice the apples - which is probably the only "labor intensive" step. Lastly we sprinkled the brown sugar and pinch of salt over the apples and mixed it until all of the apples were evenly coated with the sugar.


We cut the puff pastry into three equal parts [where seams already exist] and layered the apples in a line over the dough, leaving a small border of dough on all sides. The tarts bake for about 20 minutes until the dough puffs up nicely and browns slightly.


Ready to bake
When the tarts come out of the oven, they are ready to garnish. We sprinkled one with powdered sugar, one with caramel, and left the third one plain.

Just out of the oven 
Garnished with powdered sugar
Garnished with caramel sauce
We sampled a piece of the tart with the powdered sugar and served it up with some vanilla ice cream. It was absolutely delicious - crispy on the outside and sweet and soft in the center… the perfect combination.
Finished product - ready to sample :) 
This dessert is too easy and too delicious not to try… can't wait to make these again!

Stay tuned for next time :) 

Saturday, January 14, 2012

Day 36 - Mini Cinnamon Rolls

Day 36

Friday, December 30, 2011

Today I decided to make some mini cinnamon rolls for my family for breakfast. My plan was to make these on Christmas morning but after getting out of bed [a bit too early] to open presents, it kind of slipped my mind in the midst of all the excitement. I decided to make them today as a pre-new year's treat!

I have made cinnamon rolls before from scratch but as you can imagine it is quite a project. I have seen many recipes for "easy" cinnamon rolls on Pinterest.com [my new favorite website] and I decided to try one.. well actually two.

I found two different recipes that I wanted to try since both recipes seemed so easy. The dough I used for both versions was Pillsbury Crescent Roll dough. I started by rolling out half of the dough and pinching the seams in the dough together. The filling for the first recipe was a mixture of butter, brown sugar, cinnamon and flour. The mixture had the texture of a paste and was spread over the rolled out dough. I then rolled the dough into a log from the short end and cut it into pieces. What makes these rolls mini is that they are cut small and baked in mini muffin tins.

Cutting the log into mini rolls 
The second version was really simple as well. I rolled out the second half of the dough and brushed it with melted butter and sprinkled it with just cinnamon and white sugar. Again, I rolled the dough into a log and cut it into small pieces for the mini muffin tin.

First version on the bottom, second on the top
While the cinnamon rolls baked, I mixed together the glaze. I used the recipe from the last time I made cinnamon rolls which consists of powdered sugar, heavy cream and melted butter. I used it because it was easy to make and had a nice thick consistency. Both versions of the cinnamon rolls baked for about 14 minutes and they were ready to come out.

Version 1

Version 2
When the rolls were slightly cooled I drizzled the glaze over the top and they were ready to taste. I had a preference to one of the cinnamon buns as soon as they came out of the oven because the one with the brown sugar based filling looked ooey and gooey and delicious whereas the other ones with the white sugar looked very dry [as you can see in the pictures above].

Version 1 with the glaze! YUM!
I passed these around to the family and there was a clear winner as they all immediately reached for the oozing cinnamon rolls first. They agreed, there was really no comparison - I should have made the first recipe with all of the dough, not just half of it! These went like hot cakes!

This is a great, easy recipe for a brunch or holiday breakfast. I will definitely be making these again.

Stay tuned until next time…

HAPPY NEW YEAR!!!!