Sunday, October 31, 2010

Day 3 - Cinnamon Rolls & Blueberry Buckle

Sunday, October 31, 2010

Our THIRD baking session:

So here we are again, our theme this week is breakfast! We decided to make cinnamon buns and a blueberry buckle (thanks JOYCE for your recipe).. obviously not something to have every day but it will be nice to make on a special occasion such as for Christmas morning (if it all goes well)!

We started with the cinnamon buns. First we heated the milk until small bubbles started to form around the edges. We then took it off the heat and added a small amount of sugar and a package of yeast. Meanwhile we got our other dry ingredients ready [flour, salt, sugar, and cinnamon.] We poured the liquid into the dry ingredients and mixed it with the dough hook until it came together into a ball. Then it had to sit in a bowl to rise for about an hour and fifteen minutes.

In the meantime we started the blueberry buckle. We mixed together the batter [flour, sugar, baking powder, salt.. all the basics] then added the blueberries. The mixture was smooth with the small, plump, berries peaking through. Next, we made the crumb topping [our favorite!] which had sugar, cinnamon, flour and butter. We poured the mixture into a greased pan and sprinkled the crumbs on top. We put this into the oven to bake for 40 minutes. The kitchen smelled delicious and the the cake puffed up nicely in the oven.

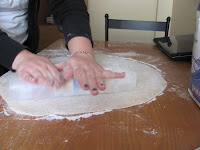
The dough for the cinnamon buns had risen and we were ready to roll it out. We rolled it out into a square [sort of] and brushed it with a little bit of butter. Next came the filling. We sifted a mixture of sugar and cinnamon over the top of the dough and began rolling the dough up into a log. We cut 1/2" pieces to create the cinnamon rolls. We placed each cut piece into a greased pan and let it sit to rise yet again [we were beginning to get impatient because they looked soo good, we were ready for them to be done!]

The blueberry buckles came out of the oven and they looked amazing! The top was slightly brown and we could see bits of the cooked blueberry bubbling through the crumb topping. We cut into the cake and it was light and fluffy. It was the perfect balance of crust, blueberries and cake! If you ever need to go to a brunch - this is the perfect thing to bring - easy enough to make and so delicious!

Just before the cinnamon buns came out, we whisked together the icing [confectioners sugar, a little melted butter, heavy cream and a touch of vanilla]. We drizzled the cinnamon buns with the frosting and they looked divine. We tried a piece of one and it was awesome - even better than the ones you've ever had in the mall!

Could today have been any better?!! Both of the confections we made today were perfection, in our opinion! Now it's time to give away our treats.. although this time it shouldn't be too difficult [we refuse to keep any extra in our houses!]

It's funny how having one successful day makes you so excited for the next time! Our next task is to find recipes that will come out just as good or better than these! Stay tuned..

Putting the yeast in the hot milk 

Mixing the dough

It's coming together!


Getting ready to roll out 

Rolling it up with the Cinnamon and Sugar on it 

Ready to cut

All cut and ready to rise again

Blueberry buckle batter

Just out of the oven!

Sooo good!


Icing

Finished product


Sunday, October 24, 2010

Day 2 - Chocolate Whoopie Pies

Sunday, October 24, 2010

Our SECOND Baking Session:

Today we decided to focus on CHOCOLATE. Our two confections today are Chocolate Whoopie Pies and Brownies.

Let's start with the brownies. We tested a recipe from Ina Garten, Barefoot Contessa, [Ina, if you're reading, we LOVE you!!!] The first task was to melt the chocolate..and since we didn't have a double boiler we put the semi sweet chocolate chips, butter, and unsweetened chocolate in a large glass bowl and tempered it carefully in the microwave. We used 20 second intervals, pulling the bowl out each time to swirl around the mixture. When the mixture was completely melted we made sure we had a shinny and smooth texture. Once the chocolate was ready, we started working on the wet ingredients which contained a secret ingredient of coffee (guess its not a secret any more!). Next we combined the above with sifted flour to complete our batter, and oh and let's not forget, extra chocolate chips. Shortly after the brownies were in the oven a sweet aroma of chocolate and coffee permeated the air around us.

NEXT, we moved onto the whoopie pies. This is a true test that separates the box bakers from the rest of us. For the cakes we creamed butter, sugar, vanilla, and eggs. Next, we sifted the dry ingredients [flour, cocoa powder, baking powder & soda] and poured the dry mixture to the stand mixer to combine. The batter looked like it came from a professional bakery kitchen!! It even tasted AMAZING!! Ecstatic with our product, we scooped small dollops onto greased baking pans. We waited anxiously, peeking in to check on our cakes frequently. The cakes came out and the looked like soft chocolate pillows. While the cakes cooled, we whipped up some fresh whipped cream. We placed a heap of whipped cream in between two cakes to create a WHOOPIE PIE!!

NOW it was time for the taste test for both of our creations. As we cut into the brownies, they were very dense and smelled like a pot of strong coffee. We tasted them and while the texture was okay, the coffee flavor was too strong for both of us. While they weren't a total failure, we would definitely use a much smaller amount of the coffee grinds in the mix next time. The whoopie pies on the other hand were awesome! The cakes were light with a slightly crisp edge and the whipped cream was dreamy. Neither the chocolate cakes or the whipped cream were too sweet and we thought it made the perfect dessert!

All and all, our second baking excursion was a great experience! Both times we have baked so far, we have learned about new techniques and new tools we need to invest in to become great bakers. Stay tuned for next week…


Day 1

Sunday, October 17th

Our FIRST baking session: We decided to start our baking adventure with a white cake and a devil's food cake [ambitious we know, but we were just so exited!] We gathered all of our ingredients on the counter and brought out Joanne's new, fancy Kitchen Aid Professional 500 stand mixer. The first problem we encountered was that the cook book we decided to use had all of the ingredients measured out in pounds and ounces [and honestly, who does that?!] We whipped out a paper and pencil and started to convert the amounts into measurements we could understand.. cups, tablespoons, etc!

We decided to start with the devil's food cake. We mixed all of the ingredients together and the batter came out quite watery. We decided to "go with it" and convinced ourselves that this was how it was "supposed to be." We popped the two cake pans in the oven and surprisingly the kitchen began to smell amazing. After a while we took the cakes out and let them cool.

Next we started on the white cake. We mixed all of the ingredients in the mixer and the batter looked great. We poured the batter into the pans and popped them in the oven, feeling much more confident since the batter seemed to be the proper consistency. After about 30 minutes, the cakes came out and looked fantastic. While the cakes cooled we cleaned up the kitchen which was covered from end to end with flour!

Next we whipped up some homemade frosting which came out surprisingly well. We flipped the white cakes out of the pans no problem but the devil's food cake on the other hand, was a different story. We had to pry the cakes out of pans which created a mess [and for all you wondering, yes we buttered and floured the pans!] After getting the devil's food cakes out of the pans, we realized the texture just wasn't right. It was gelatin like - as in when I cut a piece, I could jiggle it around without it falling apart [hows that for a visual!] Not only was it awful, it was nauseating! Needless to say, the devil's food cake ended up in the trash.

We proceeded with the white cake [trying to stay positive], stacking and frosting it. Happily, it looked great! We cut into the cake to do a taste test [after all, we can't feed it to anyone with out doing a taste test first!] Unfortunately, the texture was terrible, not moist at all and the taste was off. It was nothing like the cakes we are used to [gotta love Duncan Hines and Pillsbury!]

So after all was said and done, day 1 of baking was a total failure! Luckily we were both able to laugh it off [while unavoidably feeling a twinge of disappointment in our stomaches]. We decided not to give up and we make a date for next week. Stay tuned…